
Key takeaways
- The Napoleon Flip intro drill isolates wrist rotation and hand-switch mechanics without explosive momentum, building positional awareness and grip confidence.
- Start with a kettlebell 2–4 kg lighter than your typical bell; this is a motor-control drill, not a strength test.
- Maintain steady breathing: inhale during setup and rotation, exhale as you stabilize the bell in its new position.
- Spend 2–4 weeks drilling the intro version before layering in hip drive and speed toward the full flip.
- This drill fits best in warm-ups, skill-focused sessions, or as a low-volume accessory movement 2–3 times per week.
Who this is for
This technical sheet is for kettlebell trainees learning flip mechanics from the ground up, or those returning to flips after time away. It suits people who want to build wrist mobility, hand coordination, and positional control before attempting explosive flip variations. It is not a replacement for in-person coaching if you have pre-existing wrist, shoulder, or elbow pain; consult a healthcare provider or movement specialist before starting. This is education only, not medical advice.
Movement definition
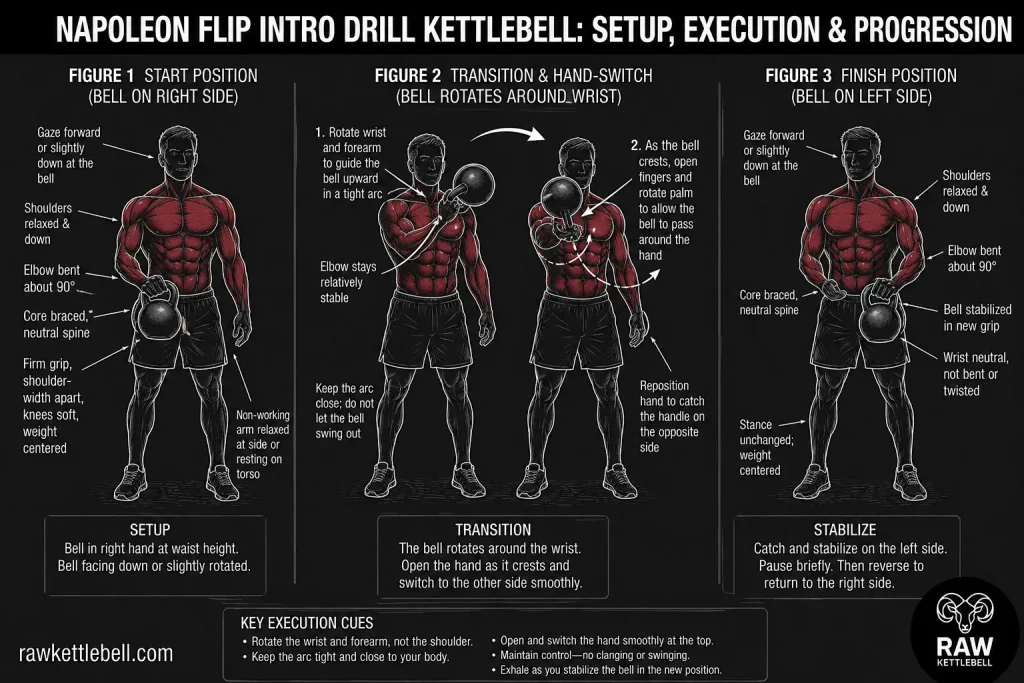
The Napoleon Flip intro drill is a controlled, non-explosive kettlebell flip that emphasizes wrist rotation and hand-switching mechanics. The bell rotates around the wrist in a slow, deliberate arc from one side of the body to the other, with the hand repositioning to catch and stabilize it at the end. Unlike a full flip, which uses hip drive and momentum, the intro drill relies on manual wrist and forearm action at a measured tempo. It builds the positional foundation needed for faster, more dynamic flip variations.
Start position & setup
- Stance: Stand with feet shoulder-width apart, knees slightly bent, weight centered. Maintain a neutral spine and relaxed shoulders.
- Grip: Hold the kettlebell in one hand at waist height, bell facing down or slightly rotated. Your grip should be firm but not white-knuckled; the handle sits in your fingers and palm, not just the fingers.
- Arm position: Keep your working arm at your side or slightly in front of your body, elbow bent to roughly 90 degrees. Your non-working arm can hang at your side or rest on your torso for balance.
- Gaze: Look straight ahead or slightly down at the bell. Avoid excessive neck rotation; let your eyes track the movement naturally.
- Mental cue: Think of the bell as an extension of your hand. You are rotating your wrist and forearm, not throwing or flipping the bell.
Execution checkpoints
Phase 1: Initiation
- From the start position, begin rotating your wrist and forearm so the bell rotates upward and outward in a smooth arc.
- The bell should rotate around your wrist, not fly away from your body. Keep the arc tight and controlled.
- Your elbow stays relatively stable; the movement originates from your wrist and forearm, not your shoulder.
Phase 2: Rotation & transition
- Continue the wrist rotation until the bell reaches the top of its arc (roughly at shoulder height or slightly higher, depending on arm length and bell size).
- As the bell crests, your hand begins to reposition: your fingers open slightly to allow the bell to rotate past your hand, and your palm rotates to catch the handle on the opposite side.
- This hand-switch should feel smooth and deliberate, not rushed. The bell should not clang or slam against your hand.
Phase 3: Stabilization
- Once your hand repositions and the bell settles into the new grip, pause briefly to ensure the bell is stable and your wrist is neutral.
- Your arm should now be on the opposite side of your body from where it started, with the bell still at roughly waist to chest height.
- Check that your grip is secure and your wrist is not bent or twisted awkwardly.
Phase 4: Return
- Reverse the motion: rotate your wrist and forearm to bring the bell back to the starting side.
- Repeat the hand-switch and repositioning as the bell returns.
- Complete the rep by settling the bell back into your original grip and position.
Breathing & bracing
- Inhale during the setup and as you initiate the wrist rotation. This prepares your core and stabilizes your spine.
- Exhale as you complete the flip and stabilize the bell in its new position. This reinforces core engagement and signals the end of the rep.
- Maintain a steady, rhythmic breathing pattern throughout. Avoid breath-holding or gasping; the intro drill should feel controlled and calm.
- Your core should remain lightly braced throughout, as if you are preparing to take a punch. This stabilizes your spine and prevents excessive torso rotation.
Common faults & corrections
| Fault | Why it happens | Correction |
|---|---|---|
| Bell swings or flies outward | Wrist rotation is too fast or too loose; you are throwing instead of rotating. | Slow down. Focus on a tight, controlled arc. Imagine the bell is rotating around your wrist, not away from it. |
| Hand-switch is jerky or the bell clangs | You are not repositioning your hand smoothly; your fingers are closing too early or too late. | Practice the hand-switch in isolation at rest. Open your fingers as the bell crests, reposition your palm, and close your grip as the bell settles. |
| Wrist bends or twists awkwardly | Your grip is too tight, or you are forcing the rotation instead of letting it flow. | Relax your grip slightly. Let your wrist and forearm do the work; your hand should feel like a passive hinge. |
| Elbow drifts away from your body | You are using your shoulder to lift the bell instead of rotating your wrist. | Keep your elbow tucked and stable. The movement should originate from your wrist and forearm, not your shoulder. |
| You lose balance or lean | Your stance is too narrow, or you are rotating your torso excessively. | Widen your stance slightly. Keep your torso still; the movement is in your arm and wrist, not your spine. |
| Bell hits your forearm or hand | The arc is too wide, or your hand is not repositioning in time. | Tighten the arc. Slow down the rotation so your hand has time to reposition cleanly. |
Regressions & progressions
Regressions
- Stationary hand-switch drill: Hold the bell at waist height and practice opening and closing your grip without rotating the bell. This isolates hand repositioning and builds confidence.
- Half-arc flip: Rotate the bell only halfway (to shoulder height) before reversing. This reduces the range of motion and lets you focus on smooth wrist rotation without the full hand-switch.
- Lighter bell: Drop 2–4 kg to reduce load and fatigue, allowing you to focus purely on mechanics.
Progressions
- Full flip with hip drive: Once the intro drill feels smooth, layer in a small hip extension as you initiate the flip. This adds momentum and prepares you for dynamic flip variations.
- Faster tempo: Increase the speed of the wrist rotation while maintaining control. Aim for a smooth, rhythmic cadence rather than explosive speed.
- Alternating flips: Perform the flip on one side, then immediately flip back to the starting side, then flip to the opposite side. This builds fluidity and coordination.
- Flip to overhead press: After completing the flip, press the bell overhead. This links the flip to a functional movement and builds shoulder stability.
- Heavier bell: Gradually increase load as your mechanics solidify. A heavier bell will feel more stable and less prone to wobbling.
Load & implement selection
- Starting load: Use a kettlebell 2–4 kg lighter than your typical training bell. The intro drill is about motor control and positional awareness, not strength.
- Implement type: Any standard kettlebell works. Avoid adjustable or unstable bells until you have mastered the movement with a fixed bell.
- Handle diameter: A handle that fits your hand comfortably is essential. Too thick and your grip fatigues; too thin and you lose control. Standard kettlebell handles (roughly 33–35 mm) work well for most people.
- Bell shape: A traditional cast-iron bell with a centered handle is ideal. Competition-style bells (with offset handles) can work but require slightly different hand positioning.
- Load progression: Once the intro drill feels effortless, increase load by 2–4 kg. Do not jump to your heaviest bell; gradual progression builds confidence and reduces injury risk.
Program placement
- Frequency: 2–3 times per week, ideally on non-consecutive days.
- Volume: 5–10 reps per side per session. Keep total reps low; this is a skill drill, not a conditioning movement.
- Timing: Use the intro drill as part of a warm-up (after general movement prep) or as a dedicated skill block at the start of a session when your nervous system is fresh.
- Session structure: Perform the intro drill before heavier or more explosive movements. Once you progress to the full flip, you can use the intro drill as a warm-up for flip-focused work.
- Duration: Spend 2–4 weeks drilling the intro version before progressing to faster or more dynamic variations. Some trainees benefit from longer periods of foundational work.
- Accessory role: The intro drill can also serve as a low-volume accessory movement on days when you are not focusing on flips, helping maintain mobility and coordination.
Related movements
- Full kettlebell flip: The explosive version, using hip drive and momentum. Progress to this once the intro drill is solid.
- Kettlebell clean: Shares similar wrist rotation and hand-switch mechanics, though the clean involves a catch at the shoulder rather than a flip.
- Kettlebell snatch: Another explosive movement that requires wrist mobility and hand repositioning; the intro flip builds foundational skills.
- Kettlebell Turkish get-up: Develops shoulder stability, wrist mobility, and body awareness; complements flip training.
- Kettlebell swing: The fundamental hip-drive movement; flips are an advanced variation that builds on swing mechanics.
- Kettlebell press: Requires stable wrist and shoulder positioning; flip drills improve the mobility and control needed for pressing.
FAQ
Q: What is the difference between the Napoleon Flip intro drill and a full kettlebell flip?
A: The intro drill isolates the wrist rotation and hand-switch mechanics without the explosive hip drive or full-body momentum of a complete flip. It builds positional awareness and grip confidence at a controlled tempo. Once you own the intro drill, you layer in hip extension and speed to progress toward the full flip.
Q: Can I use the Napoleon Flip intro drill as a warm-up?
A: Yes. It works well as a movement prep drill for 5–10 reps per side before flip-heavy sessions or as a general mobility and coordination warm-up. Keep the load light and focus on smooth transitions rather than speed.
Q: What load should I start with?
A: Begin with a kettlebell 2–4 kg lighter than your typical training bell. The intro drill is about motor control, not strength. A lighter load lets you focus on hand position and wrist rotation without fatigue masking poor mechanics.
Q: How do I know if my breathing is correct during the flip?
A: Inhale during the setup and the initial rotation phase. Exhale as you complete the flip and stabilize the bell in the new position. Avoid breath-holding; maintain a steady, rhythmic pattern that matches your rep tempo.
Q: Is the Napoleon Flip intro drill safe for people with wrist or shoulder issues?
A: This is education only, not medical advice. The intro drill is gentler than full flips because it removes explosive load, but wrist rotation and shoulder mobility are still required. Consult a healthcare provider or movement specialist if you have pre-existing pain or restriction before starting.
Q: How long should I spend on the intro drill before progressing to the full flip?
A: Spend 2–4 weeks performing the intro drill 2–3 times per week for 5–10 reps per side. Once transitions feel smooth and you can maintain wrist alignment without thinking, you’re ready to layer in hip drive and speed.